CHIBI-Engine
The CHIBI-Engine is a 2D game engine that allows users to create all kinds of 2D games. The engine in written C++11 using Direct-X10.
Since the engine is using Direct-3D instead of Direct-2D, the user can use the advantages of Direct3D like full control over the draw order of objects, ability to use shaders, have 3D models inside a 2D environment, post-processing, ....
The engine is easy to use and automates and takes care of several aspects of gameplay programming like collisions detecting and handling, resource management, scripted events, 2D animations, input management, ...
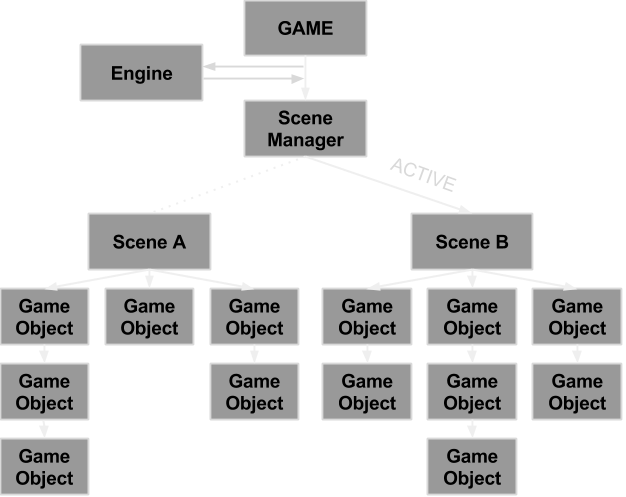
Engine structure
A game is build up with scenes that contain game objects. Every object in the game, whether its a Hero, a pickup, a tree or even a rectangle on the screen, inherits from the base GameObject class. This way every object is treated equally and can be stored in the same containers, be used as parameters in the same methods and be stored in a scene. (eg. c# Object).
You can easily create new objects by creating a class that inherits the base GameObject class. All you have to do is add code to the virtual Initialize, Update and Paint methods.
You can add an object as a child to another object to create child-parent structures. By doing this you can make sure that they will be linked both physical (inherit transformations) and code-wise (children are always painted and updated after their parents). This way you can created all sorts of dynamic entities.
Every scene has its own set of GameObjects, and manages everything from updating to painting of these objects. If a GameObject has child objects, it will manage these. This way everything gets painted and updated automatically.
Example project
If you want to see the engine in action, take a look at the KEEN++ project page. I made this remake of ID softwares Commander Keen 4 completely in the CHIBI-Engine.
You can also pay a visit to the Git-hub page. Here you can find a simple example project that showcases most of the features of the engine. There is also a empty template project that can be used to create your own games with!

Click here to check it out.
You can also pay a visit to the Git-hub page. Here you can find a simple example project that showcases most of the features of the engine. There is also a empty template project that can be used to create your own games with!
Click here to check it out.
Documentation
Tools
Level Editor
The level editor that comes with the CHIBI-Engine allows users to create levels for all their games with ease. Whether it's a side scrolling platformer or a top-down racing game, The editor is able to aid you in your level creation process.
With the editor you can create tile-base levels and add interactive game specific objects to them. The engine parses the level files automatically so you don't have to worry about loading them into your game.The level editor also has a built in collision shape generator. By providing a black-white collision tileset, the editor will automatically build a collision shape to use in your games.

Animation Editor
The animation editor helps you to create 2D animations sampled from a spritesheet or multiple images.
The editor also has a preview screen so you can see what the animation looks like after every change.
A animation file can contain multiple animation sets, each containing their own animations made up out of key frames. A key frame contains data concerning which part of which spritesheet has to be played for a given time.
By using this editor the animation creation process goes much faster then it would if you'd write all the animations manually.
Features
Click on one of these features to roll-out additional information and example code.
Output a message to the console
Output a value to the console
Trigger a pop-up window
Trigger a condition based critical pop-up
In release mode, the program will show a pop-up message and close.
In debug mode, the program will break at the point of assertion and write the message to the output window.
Trigger pop-up messages within a try-catch structure.
Check if a key has a state
Remove a key message so it won't be registered by other objects
Add an action to the manager
Run an action at any given time
Store an action to run later
Automatic collision checking and handling
Manual collision checking and handling
Ray casting on a single object
Raycast on every object with a certain tag in the scene
Example of a XML file
Sample of creating a Hero with an animation
Example of adding a texture to the manager.
This can be hard coded or written in an .XML file (to allow players to change the sprites)
Create a sprite (a quad with a texture) with just one command
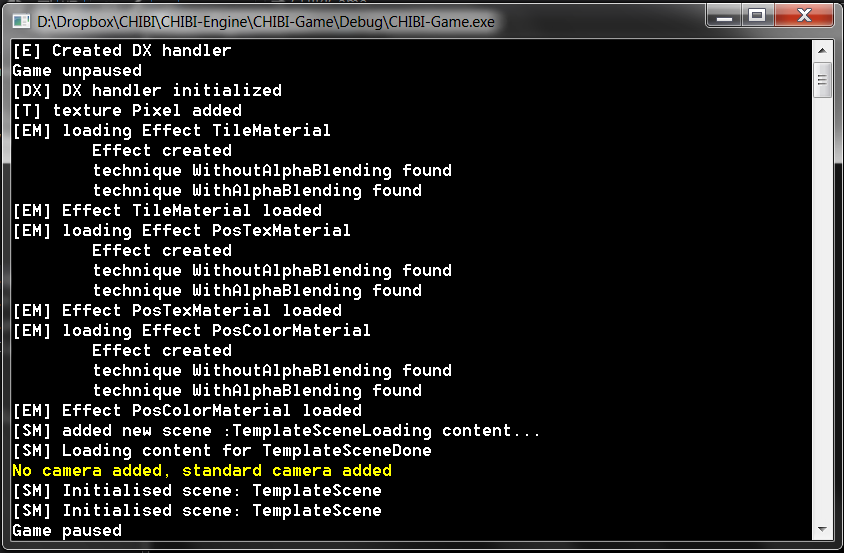
Easy to use debug system
- Write data to a debug console.
- All managers output warnings automatically to notify if something fails.
- Save console to a text file to review later.
- Different levels of messages (Normal, Info, Warning and Error) each with a certain color so errors can be spotted immediately.
- Invoke pop-ups to alert player / developer.
- Try catch system.
- Debug and release ASSERT system
Output a message to the console
       //Use the global Log function
       Log(_T("Message"),MESSAGE_LEVEL_NORMAL);
Output a value to the console
       //Use the  static LogN template method of the Debug class
       Debug::LogN(_T("Hero position x"),position.x);


        //The output will look like this
        Hero position X: 312
Trigger a pop-up window
        //Use the static Pop-up method of the Debug class
        bool closeProgram = false;
        Debug::Popup(_T("Message in the pop-up"), _T("Title"), closeProgram);
Trigger a condition based critical pop-up
In release mode, the program will show a pop-up message and close.
In debug mode, the program will break at the point of assertion and write the message to the output window.
        //Use the static Assert method of the Debug class
        bool condition = false;
        Debug::Assert(condition,_T("The condition isn't valid"),_T("Title));
Trigger pop-up messages within a try-catch structure.
        //Try catch with the ErrorMessage object
        try
        {
        	//Throw an ErrorMessage object by value
			throw(ErrorMessage(_T("Error message"),_T("Title"),closeProgram));
        }
        //Catch the ErrorMessage object by reference
        catch(ErrorMessage &error)
        {
        	// Run the Fire method to show the pop-up window, and potentially close the program.
            // You could save backup data before shutting down in this catch block.
            error.Fire();
        }
Multithreaded Input manager
- Mouse and keyboard support.
- Check if any key/button has been pressed, is being pressed
- Check combination of keys/buttons that are pressed at the same time.
- Ability to remove input messages so they are only registered once (easy when you have UI screen rendered on top of each other).
Check if a key has a state
        //Check if the key message is present
        CHIBI->GetInputManager()->CheckKeyState(KEY_MOUSE_LEFT,KEYSTATE_UP);
Remove a key message so it won't be registered by other objects
        //Remove the message from the Input Manager
        CHIBI->GetInputManager()->RemoveMessage(KEY_MOUSE_LEFT,KEYSTATE_UP);
Fully implemented tile map system that renders tiles instanced
- Tiles are drawn using direct-3D instancing so the number of draw calls is reduced drastically
Scripted actions
- You can easily write scripted actions using c++11 lambdas (or functors) and add them to the Action Manager.
- Easy to use for button action, pickup actions, collision actions, ...
- Run an action at anytime from anywhere in your code with a single command.
Add an action to the manager
    //Add an action to the manager, with a given tag
	CHIBI->GetActionManager()->AddAction(_T("PickupGem"),[&,this] () -> void
		{
			auto heroPtr = GetGameobjectByName(_T("Hero"));
			heroPtr->AddItem("Gem");
		}
	);
Run an action at any given time
    //Run an action that is present in the manager
    CHIBI->GetActionManager()->RunAction(_T("PickupGem"));
Store an action to run later
    //Store an action that is present in the manager
    auto& m_PickAction = CHIBI->GetActionManager()->GetAction(_T("PickupGem"));

    //Run the action
    m_PickAction();

    //Remove action
    CHIBI->GetActionManager()->RemoveAction(_T("PickupGem"));
Automated very fast vector based collision detection and handling
- Collision detection and handling in only 5 lines of code!
- Add objects to the collision manager and give them a tag (‘Hero’, ‘Mob’, ‘Pickup’, ...).
- Let objects check for collision with objects with a given tag (‘Hero’ checks for collision with ‘Pickup’).
- Script or code the OnHit event using c++11 lambdas.
- You can also manually check for collisions with objects that are added to the manager.
- You can also use Ray casting on either all objects in the scene, all objects with a certain tag or just a single object.
Automatic collision checking and handling
     //Create the hit region
	 auto hitRegionPtr = GetScene()->GetCollisionManager()->CreateHitRegionForObject(this,_T("Pickup"));

    //Check for hero
	hitRegionPtr->AddCheckTag("Hero");

    //Ignore every hit region that doesn't have the 'Hero' tag
	hitRegionPtr->OnlyCheckTags();

    //Define hit-action
	hitRegionPtr->SetListener([&](GameObject* objectPtr, const tstring& tag)->void{COLLISION ACTION});
Manual collision checking and handling
     //Create the hitregion
	 auto hitRegionPtr = GetScene()->GetCollisionManager()->GetHitregionByObject(this);

    //Get Hero hitregion
	 auto heroHitRegionPtr = GetScene()->GetCollisionManager()->GetHitregionByName(_T("Hero"));

    //Check collision
	if(hitRegionPtr->HitTest(heroHitRegionPtr))
    {
   		//DO SOMETHING
    }
Ray casting on a single object
     //Get the level hitregion
	 auto levelHitRegionPtr = GetScene()->GetCollisionManager()->GetHitregionByName(_T("Level"));

    //Define ray
    Vector2 startPos(0,0);
    double raySize = 100;
    UINT maxResults = 4;
	Ray ray = Ray(startPos,Vector2(0,-1),raySize,maxResults);

    //Cast rays on the object
    if(levelHitRegionPtr->Raycast(ray))
    {
    	RayResult& result = ray.results[0];
        //DO SOMETHING
    }
Raycast on every object with a certain tag in the scene
    //Define ray
    Vector2 startPos(0,0);
    double raySize = 100;
    UINT maxResults = 4;
	Ray ray = Ray(startPos,Vector2(0,-1),raySize,maxResults);
    ray.AddTag(_T("NPC"));
    ray.onlyTags = true;

    //Raycast on every object in the scene
    if(GetScene()->GetCollisionManager()->Raycast(ray))
    {
    	RayResult& result = ray.results[0];
        //DO SOMETHING
    }
Easy to use 2D sprite sheet animation system using XML files
- A XML file contains all animation sets of an entity.
- Every animation set has a name and a certain amount of key frames
- Every key frame contains data about the part of the texture that needs to be rendered, the texture that the frame is taken from (possibility to use multiple textures for 1 animation) and a length.
- Play animations with just one command.
Example of a XML file
Sample of creating a Hero with an animation
    //Add the animation to the animation manager
	CHIBI->GetAnimationManager()->ParseAnimationFile(_T("./Resources/Animations/Hero.anim"));

    //Create an actor with a certain animation ('Hero' is the animation set, not the file)
    auto newActorPtr = new Actor(_T("Hero"));

    //Play the 'Walk' animation of the 'Hero' animation set
    newActorPtr->PlayAnimation("Walk");
Resource managers to automate the loading, managing and removing of resources
- Textures (all file types that are supported by Direct-X)
- Fonts
- Shaders (hlsl)
Example of adding a texture to the manager.
This can be hard coded or written in an .XML file (to allow players to change the sprites)
        //Add the images to the Image manager by giving them a tag
		CHIBI->GetImageManager()->AddTexture(_T("PATH TO FILE"), _T("TAG"));

        //Retrieve images by using just the tag, no need to store the file path everywhere
		if(CHIBI->GetImageManager()->IsTexturePresent(_T("TAG")))
        {
			auto& texture = CHIBI->GetImageManager()->GetTexture(_T("TAG"));
        }
Create a sprite (a quad with a texture) with just one command
        //Use the CreateSprite method of the Imagemanager
		auto spritePtr = CHIBI->GetImageManager()->CreateSprite(_T("TAG")));

        //Add the new sprite as a child to the current object
        addChild(spritePtr);
Camera management
- Create multiple cameras.
- Switch between cameras.
- Follow Camera: Center of an object.
- Limit camera: Make sure the camera doesn’t leave a certain rectangle If the screen is bigger than the limit rectangle, the rest will be blacked out. This allows the user to create multiple rooms in the same map, and make sure the player doesn’t see them until he’s allowed to.
- Inherit the base Camera class and create your own dynamic cameras.
Managed timer system to control timed events
- Every timer is ticked automatically and can be paused, stopped and restarted with a single command.
- Timers can be set to pause when the game is paused.
- Different kinds of timers to suit every need.
- Countdown timer: Start at a given time, and count back to 0. If the timer hit’s zero it automatically stops.
- CountdownAction timer: Same as the countdown timer, but an action is fired when the timer hits 0.
- StopWatch timer: Starts at 0 and counts up. The current time can be retrieved at any moment.
UI and HUD system
- Create a UI with ease.
- Create different UI elements and add them to the UI.
- Base HUD elements present : Text, Bitmap, Rectangles, Values (auto updating pointer values).
- Interactive UI element: Button, Text box, Scrollbar.
- Create your own HUD elements by inheriting the base HUDElement class.
- Not only for games but also for tools like Level Editors.
        //Add the HUDBackground image to the Image manager, and enable the HUD_USAGE flag
		CHIBI->GetImageManager()->AddTexture(_T("./Resources/Images/HUD.bmp"), _T("HUD")
        , IMAGE_USAGE_HUD);

        //Create a UI objects
        UI* hudPtr = new UI();

        //Add the HUD as a child to the current object (A UI object is a GameObject)
        AddChild(hudPtr);

    	//Create a UIBitmap object to draw the 'HUD' bitmap on the HUD
        auto hudBGPtr = new UIBitmap(_T("HUDBg"),_T("HUD"));
        hudBGPtr->Scale(2);

        //Add the UIBitmap element to the HUD
        hudPtr->AddElement(hudBGPtr);
Every object inherits from the same GameObject class
- This has the advantage that tree structures can be created and methods can function on all objects in the scene
Child parent structure to inherit transformations of parent objects
- Add game objects to a scene.
- Retrieve any object present in the scene from anywhere in your code. (No need to store a pointer to every object yourself)
Support for multiple scenes
- Have multiple scene loaded so you can switch between them with ease
- Useful for menus
        //Add scenes to the Scene Manager
        CHIBI->GetSceneManager()->AddScene(_T("MainMenuScene"),new MainMenuScene());
        CHIBI->GetSceneManager()->AddScene(_T("LevelScene"),new LevelScene());

        //Activate a scene
        CHIBI->GetSceneManager()->SetActiveScene(_T("MainMenuScene"));
Scaling, rotating and translating sprites on all their axis.
- Every game object has its own scale, rotation and position in local space and global space.
Future additions
Since I made this engine mostly in my free time, combining it with my school assignments, I haven't been able to focus 100% on it. Therefore the engine is far from finished. I have a list with a couple of features that I would like to add in the future.
- Post processing
- 2D particles
- Support for .obj files
- Sprite fonts
- LUA scrtipting
- Sound
- Binary loading (instead of .XML)
- Serialization manager to simplify saving and loading games
- Making the engine multi-platform
- Feature complete editor
- ...